Converting a React App to TypeScript
A practical tutorial teaching you all you need to use TypeScript today
TypeScript is one of the fastest-growing programming languages. In 2020, it became the 4th most popular language on Github. One of the appeals of TypeScript is that it is a superset of JavaScript, meaning that plain JavaScript is valid TypeScript. As a result, one of its most enticing value propositions is that you can slowly introduce TypeScript and all its benefits to an existing JavaScript codebase.
This tutorial aims to provide a practical example of how you can begin the process of adding TypeScript to your repo. My hope is that the straightforward examples in this tutorial can be used as a reference. Among the topics covered are:
- Configuring editor
- Installing dependencies
- Configuring Webpack to handle .ts and .tsx files
- TypeScript Linting
- Adding type safety to our app
Note: I am by no means an expert on this topic. If you have any feedback on how to improve this tutorial or notice any inaccuracies, please reach out. :)
Without further ado, let’s get started.
Type Safety in JavaScript
JavaScript is an untyped language. Accordingly, it is susceptible to type safety bugs. This occurs when a type other than that expected is used by mistake. Recent studies have suggested using type annotations in JS can prevent as many as 10% of bugs.
Fortunately, there have been a number of solutions that have been built with the aim of adding type safety to JavaScript. They include:
- Flow — A type-safety system developed by Facebook
- TypeScript — A superset of JavaScript developed by Microsoft
- ReasonML — A Facebook-created JS-like syntax on OCaml that leverages its strong type system that compiles to JS as well as native code.
- Rescript — A new “fork“ of the ReasonML project, focused specifically on JavaScript
Some of the main benefits and features of using TypeScript, specifically are:
- Optional static typing
- Incremental adoption
- Type inferences
- Utilize new language features
Below is a great video if you want to learn more about TypeScript and the benefits of typing your JavaScript.
Now that we have learned a bit about TypeScript and its benefits, we will now set up our environment.
Environment Setup
Before we get started let’s get you set up with the starter project and your environment.
Editor Setup
We recommend that you download Microsoft’s VSCode Editor. TypeScript support is built into VSCode by default; since they are both Microsoft products.
Repo
You can clone the starter repo that will be used in this training from the link below.
There is a branch with our final code for reference.
*Note: This starter repo is based on a modified version of Marcos Lombog’s Babel, Webpack, React starter repo. He wrote a great article on setting it up here.
What is the project?
For this tutorial, we will be taking a bare-bones shopping cart app and slowly adding type safety to the repo. The example app is somewhat contrived and poorly architected with obvious errors. These will be useful in helping us learn and apply the concepts.
Exploring the App
After pulling the repo, install dependencies and start the app. Upon seeing the app, you should see a basic table that allows you to add quantities for each product in the cart.
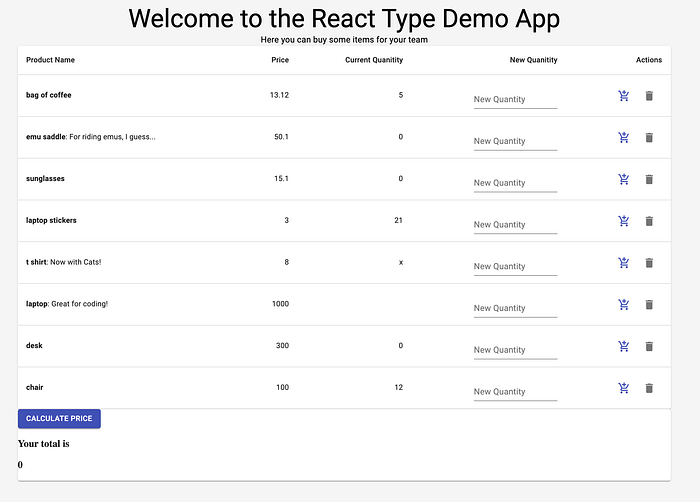
As you can see some of these cart values have improper values like 'x'. Below is the code block with the default values:
When you try to calculate a total price, you receive a very strange string as a result. This is due to having a number of non-numerical values and quirks in how JavaScript conducts mathematical operations on these types. With type checking (and some common sense), we can avoid errors like this.

Configuring and Installing TypeScript
In this section, we will integrate TypeScript into our app and configure it for use with our application. By the end of this section, we will be able to create new TypeScript files or convert JavaScript files to TypeScript.
Installing TypeScript Dependencies
First, let us get started by installing some needed dependencies that allow us to begin using TypeScript effectively in our app. Here is a list of the installed packages:
- typescript — The base TypeScript package. It installs the TypeScript compiler
- @typescript-eslint/eslint-plugin — Allows you to configure linting rules for TypeScript
- @typescript-eslint/parser — This is a parser used by eslint to parse TypeScript files.
- ts-loader — A webpack loader for TypeScript files.
A Quick Look at TypeScript Compiler
As mentioned earlier, TypeScript is a superset of JavaScript. TypeScript works with JavaScript because it compiles into JavaScript. By installing the ‘typescript’ package, we get access to the TypeScript compiler.
Let us first look at a quick example of how this works.
Note: This file will just be used for illustrative purposes.
We will create a file in our root folder that is named type-test.ts. Once you have created the file, please paste in the code below.
Now that we have added a TypeScript file, we will now need to add a script into our package.json to leverage the TypeScript compiler. Please add the following command to the “scripts” section in your package.json.
Note: “tsc” stands for typescript compiler.
As you can see in the script, it uses the ‘tsc’ command which is short for the TypeScript compiler. If you run this script, you should see the following output.
The TypeScript compiler uses some default configuration to determine how to compile the TypeScript file to JavaScript. In the next section, we will configure our TypeScript compiler and look at the options available in the next section.
Configuring our TypeScript Compiler
TypeScript allows you to configure the compiler through the use of a tsconfig.json file. There are a ton of different configurations and options. You can read more about them in the TS config docs.
Below is a configuration file that has been commented on to explain what the options do (to the best of my knowledge) or why they were configured as such. The purpose of this configuration is to allow us to easily transition to using TypeScript in our repo. As a result, most of our options are built to not enforce the most stringent type checking.
Configuring Webpack for TypeScript
While you could, in theory, use the built-in compiler to output .js files and import them into your JavaScript, this would be a manual and tedious process. As a result, it makes sense to use a bundler like webpack to handle this for us.
We need to update just a few items in our webpack.config file to load our .ts and .tsx files. The changes we need to make are:
- Add a sourcemap to help debug (optional)
- Resolve the
.tsand.tsxextensions - Add the
ts-loaderto handle our.tsand.tsxfiles
Below is what the final file looks like with comments highlighting the change.
Optional — Configuring Linting for TypeScript
Linting is a great tool to help us format our code and maintain consistency. Fortunately, We can now add linting to our app easily. TSlint has been deprecated and eslint can now handle linting our typescript too!
We will update our eslint configuration by doing the. following steps:
- Use the
@typescript-eslint/parserparser to parse our file. - Add in our two TypeScript specific plugins.
- Lastly, we will turn off the
no-empty-interfacerule. This allows us to avoid seeing linting warnings when build functional React components with no props.
Below is what this updated configuration looks like.
Lastly, We just need to update our package.json script to add the .ts and .tsx file extensions.
Converting Our App to TypeScript
We can now begin using TypeScript by renaming our existing files to use the TypeScript file extension. Let’s start by renaming our entry point to index.ts from index.js. Also, remember to make sure to update your entry point in webpack.config.js.
After you make your update remember to kill your server and restart it. After you make the change, you should see the following:

Since our index.ts file uses JSX syntax, the compiler fails to recognize it. It will only recognize JSX in files ending in .tsx. If we rename our entry point to index.tsx, the app works. By contrast, if you try renaming your cart.js to a .ts file, you will encounter no problems with your build since JSX is not used.
Understanding Types vs. Interfaces in TypeScript
TypeScript does have a degree of type inference, but for the purpose of learning, we will manually type our application.
There are two ways to define types: interfaces and types. They have a number of differences. You can use what you prefer, but Microsoft generally recommends the use of interfaces where possible.
In general, interfaces are useful for objects. They allow you to denote the shape of the data you are using.
Types (or type aliases as they are known) are, in my opinion, better for functions and individual properties.
Below are two videos with some more information on differences and possible approaches.
Adding Types to Plain JS Files
In this section, we will begin adding types to our project. We will focus on adding types to our files not containing JSX like our utils file.
I like to centralize the location of our type definitions so they can be easily imported and reused. We will first add a types folder in our src directory. Once this is done, we will take a look at our product.js file in our constants folder. As you can see our product information is an array of objects with a number of properties like id, quantity, etc. Below is an example.
Let’s now create an interface that defines the expected properties of a product. Let’s create a file called product.ts in our types directory.
Once we have created the file, let’s write our first interface. Below is the declaration.
Now that we have defined an interface, let’s use it in our application! Let’s type our list of products using our interface. This is located in constants/product.js.
Our first step is to rename the file to product.ts to unlock the power of TypeScript.
Next, we have to import our Product interface. We will then annotate our list to denote that its type signature is an array of Product.
Here is a look at what our updated file should look like. We have added in some comments as well.
After making this change and starting the app you should see … an error!

We can fix this by making the “description” property optional.
Additionally, we can also define a ProductList type. We will head to our types/product.ts file and update it with the following code.
Upon restarting the app, it should now correctly compile. If you want you can also replace Product[] with our new ProductList type. In the next section, we will take a look at typing functions.
Adding Type Signatures to Functions
In this section, we will be typing our cart utils file. This file is responsible for calculating the total of our cart. As always our first step is to rename our cart.js file to cart.ts.
We should note that this file uses lodash. If we want to leverage the type safety that TypeScript allows us, we need to import type definitions for lodash. These definitions will let the compiler know what types our lodash functions expect as arguments and what type they return.
Instead of having to manually type these functions, there is a project on Github named DefinitelyTyped. There are a large number of type definitions for a ton of different common packages. Let us first install the types for lodash with the below script.
Let us now import our product types that we defined. Let’s now type our first function to calculate the total cost of a product. We will see two approaches to do this: inline or predefining a type alias.
Whichever approach you use is up to you.
I like to use inline typing generally if the function is not reused. This allows the typing to sit next to the logic, functioning as documentation.
I usually use the type alias approach for functions that are passed as props or reused. We can now continue to type the rest of our file.
Below is our fully typed file.
Adding Types to React Components
We will now begin to look at adding types to our React component. First, let’s install the type definitions for the React libraries that we are using. We can do so with the below script.
We now want to rename our component files to the .tsx extension. After we rename our files, we want to restart our server. You should then see the following error.
Reason — cart utils typing detected that we are passing incorrect type in App.tsx.

The issue is that our initial calculated price value is a string and does not match what our calculatePrice function expects. As a result, if we change this value to 0 (the number), we will have our app compile.
Additionally, our initial cart value uses the contrived “initialProductListWithTypeErrors” which will also cause issues, so let’s go ahead and replace it with our vanilla product list.
We can also begin typing our App.tsx file. Below is our typed file with some comments on our typing.
*Note: As you can see no props are passed to our App component. As a result, we would see the no-empty-interface linting error if we had not turned off the rule.
Consolidate Types for React Components
Before we type the rest of the application, we will be passing some functions down a few level. As a result, we will make a type alias for our two functions: deleteFromCart and updateCart. We will also leverage some interesting module functionality that typescript allows us to use.
We will create two files in our types folder. One for our function type aliases named react.ts and an index.ts file to export all our types definitions from a central place.
Below are our new type declaration files.
We can now update our App.tsx file to import all our defined types from one place. Below is our updated App.tsx file with updated types.
Finish Typing the Rest of Our App
Now that we have finished typing our App.tsx, let’s finish the rest of the app. Typing the rest of our app should be fairly straightforward.
First, let us type our ProductTable file. In this file, we will create an interface for the props passed to our component. Note that we pass a Product type into ProductRow, this will be helpful when typing our next component.
Below is what the fully typed ProductTable file looks like.
Moving down a level to the ProductRow, we will again type the props of the component. Since each ProductRow is passed a Product, we can extend that type to avoid having to repeat defining all its properties and their type definitions. It also allows us to add any additional property types.
Additionally, we also will type our Input field and the useState variable of newProductTotal. This allows us to ensure that our values update correctly.
Here is a great cheatsheet on input form typing in React.
Lastly, we also will type the functions that we are passing to the ProductActions component. Since they do not return any values, we just type them to return void. Below is what that would look like.
Lastly, typing ProductActions is very straightforward. We just have to type the props. We make both of the functions return void since no value is returned.
And we are done!
Closing Thoughts
In closing, I hope you have learned how you can use TypeScript in your apps today. It is not a 100% catch-all for all errors, but it should help you catch a fair amount. Additionally, It can allow you to use future features of JavaScript now.
While this by no means an exhaustive guide, I hope it points you in the right direction and makes you more comfortable.
